We thank you for purchasing our product. Hope our product will be of great help for you to succeed. We appreciate your decision to read the manual before request for our support.
Vrysa is a Mail that is flexible and customizable for setting and changing any elements wihtin a minutes via Powerful Theme Options, you also can customize Google fonts without code very easy and simple.
Vrysa can be used for various of purpose, especially built for Food & Organic Online Store. Vrysa is fully comapatible with all of SEO standard that help your business to have a high rating search on Google Search. Every page of Vrysa is fully responsive, so it can be viewed easily no matter of different screen devices like: desktop, tablet and mobile. All that make your customers have a interesting shopping experiences.
Vrysa is high quality and smart design that comes with different 6+ homepages will give you a large of choices. You'll be easily to find the best for your purpose without spending too much time.
To install this theme you must have a working version of WordPress. Please refer to WordPress documentation for further instructions. You can download the latest version of WordPress here https://wordpress.org/download/

Compatible Browsers: IE9+, Firefox, Safari, Chrome, Opera
All of our items come with free support, and we have an advanced ticket system to handle your requests. Support is limited to questions regarding the theme’s features or problems with the theme. We are not able to provide support for code customizations or third-party plugins. If you need help with anything other than minor customizations of your theme, we suggest enlisting the help of a developer.
To find your licence key/purchase code you need to log into your ThemeForest account and go to your Downloads page.
Locate some of the Themes Kingdom themes you purchased in your Downloads list and click on the Download and next on the License Certificate & purchase code link in drop-down menu.
After you have downloaded the certificate you can open it in a text editor such as Notepad and copy the Item Purchase Code.


After purchased our theme, you need to go your download area, click on button Download and select download All files & documentation.

After download completed, you need to unzip the package and select the way you want to install the theme.

Once the download is complete, unzip the file and you would see the following packages:
Please, follow the steps below to install Vrysa Theme (Make sure you had extract files).
Step 3 – Click Add New button on top of the page.

Step 5 – Next, Browse to the zip file and click Install now for the theme to be uploaded and installed.

IMPORTANT NOTE
You need install all required plugins after install parent theme. You should only install Child theme after complete install all required plugin. Click here to see how to install child theme
Using an FTP software like File Zilla or CuteFTP to upload the theme files to your WordPress site.
The first, extract the theme file "Vrysa.zip", you will have a folder "Vrysa" include all theme files and folders (css, images, fonts...).
Please, follow the steps below to install the theme via FTP:
Please, follow the steps below to install required plugins:
Step 1 - After activating the theme, you will be asked to installed the required and recommended plugins, you can proceed by clicking on Begin installing plugins

Step 2 – In the next page, check all the plugins that you want to install then on the drop down Bulk Actions, choose Install then click Install, the plugin installation process will start.

Step 3 – Check all the plugins that you want to activate then on the drop down Bulk Actions, choose Activate and click Apply, the plugin installation process will start. Wait for all the plugin activated then you can start customizing your website as you wish

We very happy to provide for customer a new function to import data more quickly. It is "One click import"
With "One click import", customer do not import step by step data as import usual. It import all data like : Content, Widget, Revolution slider, Menu, Customize...
Step 1 - Login to your WordPress Dasrdoard.
Step 2 - Go to Tools > Tbay Demo Import
Step 3 - Download Demo data

Step 4 - Install Demo Data

Step 5 - Wait to importing success


If "Download Demos" don't work, you should upload the sample data manually:
- Upload Data to the directory "ROOT/wp-content/uploads/{theme_name}_import/".
- Eg "ROOT/wp-content/uploads/cena_import/"
- Can use the "WP File Manager" plugin and import as like this video's tutorial or upload files via FTP.
To avoid duplication of data, you should reset data before for each import of data.
Step 1 - Install Wordpress Reset plugin.

Step 2 - Reset Database

Step 3 - Import Data again.

Video Tutorial:
The importer should be run only once. If something went wrong and you need to import the content again, you may need to reset your WordPress.
Use this plugin to reset the WordPress database : http://wordpress.org/plugins/wordpress-database-reset/
Error or Problem with Import of the Demo
If you have problems importing the demo ( example : infinite loading, error 505 with when using wordpress importer ) then you may have a problem with the server settings.Please check these:
If the import stalls and fails to respond after a few minutes, or it fails with a simple error message like “Import failed,” You are suffering from PHP configuration limits that are set too low to complete the process. You should contact your web host and ask them to increase those limits to a minimum as follows:
You can verify your PHP configuration limits by installing a simple plugin found here. And you can also check your PHP error logs to see the exact error being returned.
Also if possible update your PHP version to 5.5
After doing this you can reset your database using the WordPress Database Reset Plugin and try to re-import the demo data ( WARNING : Reset the database will make you lost all the data of your current wordpress )
If you still have problem your web host may uses process watching software that prevents bulk processing on their web servers.
If you have problem please submit a ticket and we will help you to import the demo.
You can upload your logo image in the Vrysa Options. If the logo is not uploaded, then your site name will be used.
Please, follow the steps below to upload your logo:
Step 1 - Login to your WordPress Dasrdoard.
Step 2 - Go to Vrysa Options > Header Tab
Step 3 - Upload your logo by clicking on Select Image ( our current Vrysa logo is 150px x 50px ).
![]()
Step 1- Login to the WordPress Dasrdoard.
Step 2- From the 'Appearance' menu on the left-hand side of the Dashboard, select the 'Menus' option to bring up the Menu Editor.
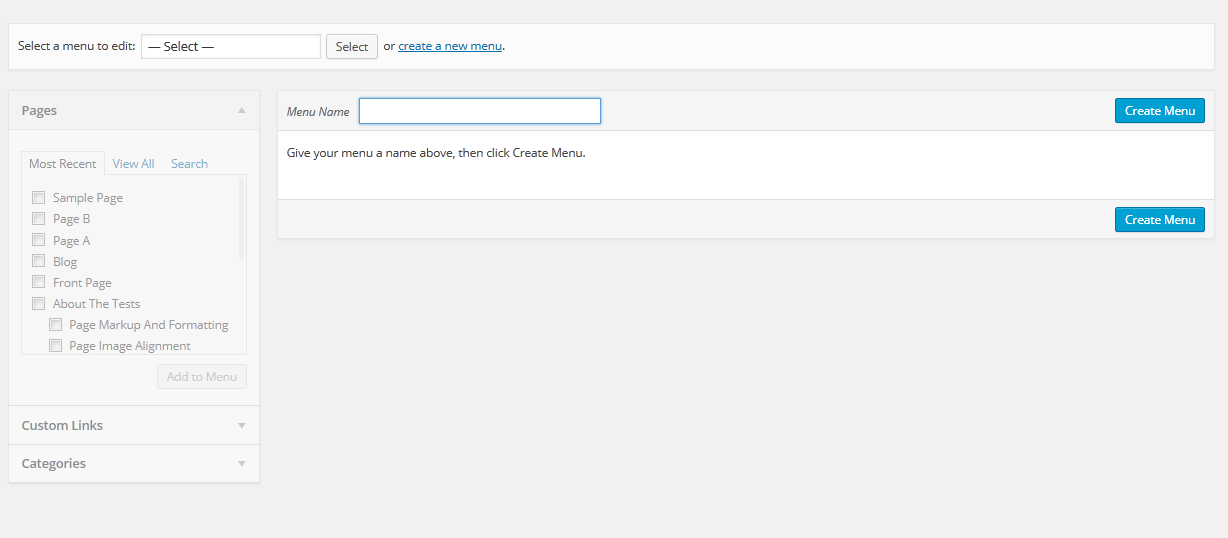
Step 3 - Select Create a new menu at the top of the page.
Step 4 - Enter a name for your new menu in the Menu Name box.
Step 5 - Click the Create Menu button. Your menu is now defined, and you can now add pages to it (steps below).
Step 1 - Locate the pane entitled Pages.
Step 2 - Within this pane, select the View All link to bring up a list of all the currently published Pages on your site.
Step 3 - Select the Pages that you want to add by clicking the check box next to each Page's title.
Step 4 - Click the Add to Menu button located at the bottom of this pane to add your selection(s) to the menu that you created in the previous step.Step 5 - Click the Save Menu button once you've added all the menu items you want. Your custom menu has now been saved.
The Screen Options allow you to choose which items you can use to add to a menu. Certain items, like Posts or Products are hidden by default. The Screen Options are located in the top right corner of your WordPress Dashdoard.


Once you've created a menu and filled it with items, it's time to assign it to one of the theme pre-defined locations.
- Go to Appearance > Menus and click Manage Locations.
Menu is assigned after import data by "One click import".
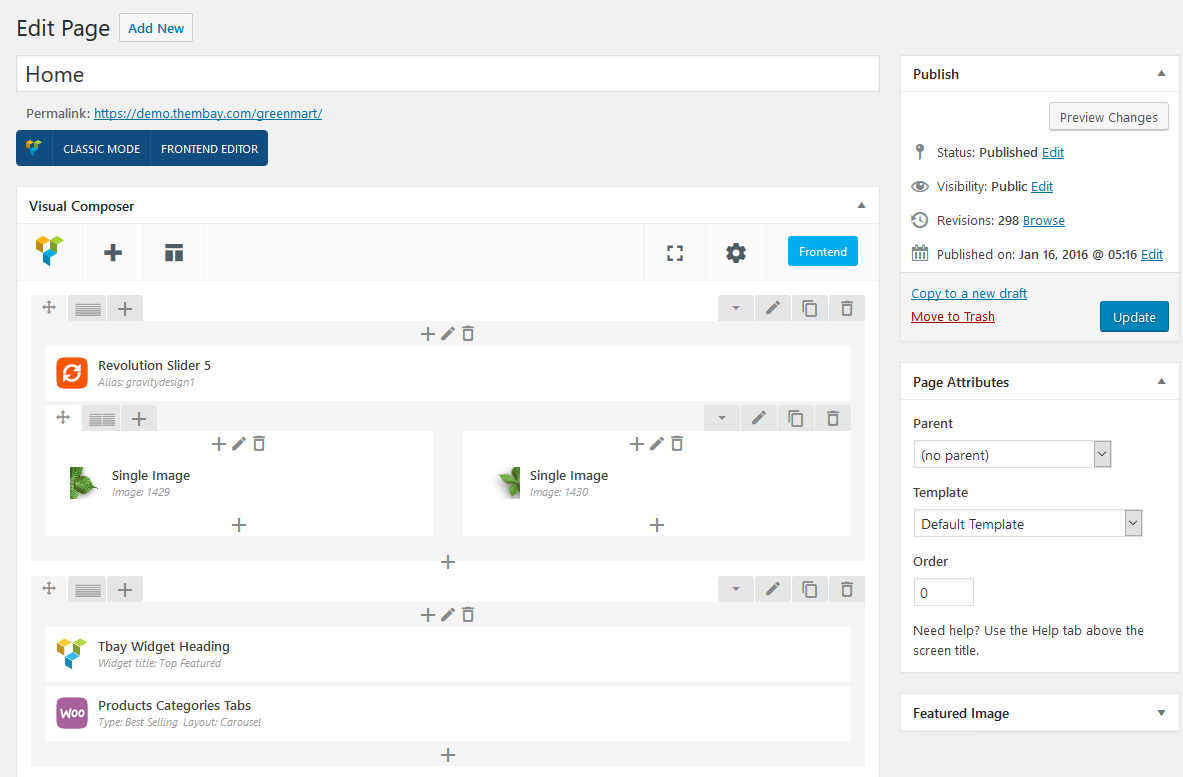
You can quickly build a home page using Visual Composer for WordPress that is drag and drop frontend and backend page builder plugin that will save you tons of time working on the site content. You will be able to take full control over your WordPress site, build any layout you can imagine – no programming knowledge required
From your Dashboard admin Navigate to Pages
- Select All Pages to see all page then click edit one page you want
- Select Add New to create new page
Have you ever used Visual Composer ? Please follow that guide first : Visual Composer guide
Official Plugin Documentation For More information about the Visual Composer check the official documentation.
1. Classic Mode.
You can insert code on table then Home page will be created automatically.

2. Backend Editor Mode
Drag and drop elements you need to build your page layout.
How to use Back End Mode
a. Add and modify Row Layout
Step 1 - Go to your page / post, first activate the backend editor and click Add Element

Step 2 - Select the Elements you want to use.

Step 3 - Click on the Edit This Row (pencil icon) to Edit the Row element ( in our example we use row with 3 columns filled with text block )

Step 4 - To change the Row layout ( number of columns ) you need to click the second Icon from the left then select a layout or custom to make your own

b. Edit Element
Pencil Icon - To Edit Row, Column or Module you need to click the Pencil icon.

c. Duplicate Element
Pages Icon - To Duplicate Row or Module you need to click the Pages icon.

d. Remove Element
Trash Box Icon - To Remove Row, Column or Module you need to click the Trash Box icon.

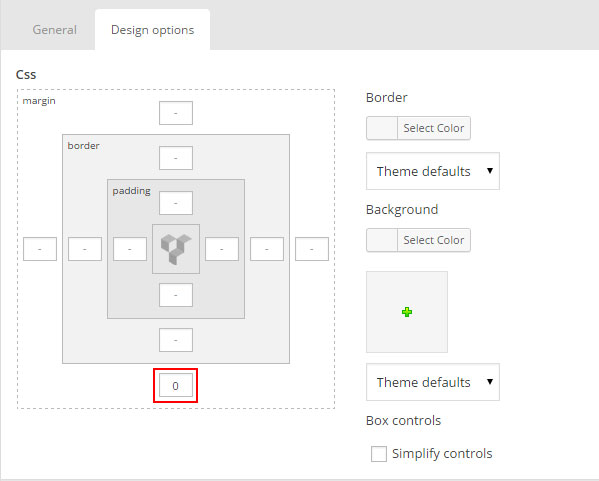
e. About Row / Column / Custom heading / Text Block Design options
Design Options - When you edit row / column / custom heading / text block module, you can edit the design options

Row / Custom Heading / Text Block element have a default Bottom Margin of 35 pixel, you may want to set it to 0 if you don't want to have bottom space
It is Good to add bottom Padding to your Column, so they will looks good on mobile

Left and Right Margin should NEVER be modified, please left blank
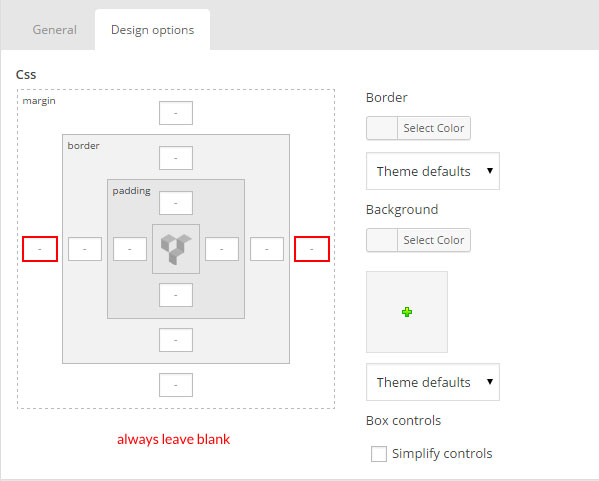
For Row module the Left and Right Padding should also NEVER be modified, please left blank

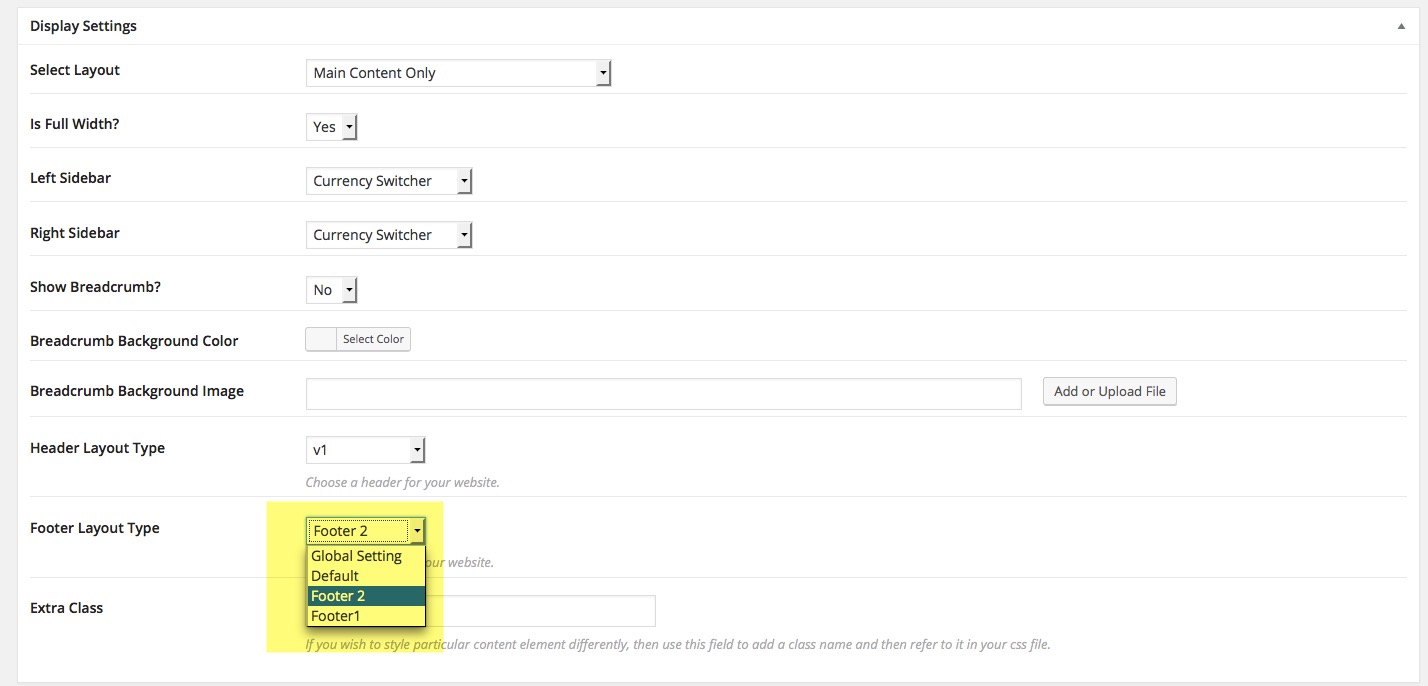
a. Page Attributes
You can select page attributes on right sidebar of page admin layout. Each Page templates have each styles

b. Page configure default template
For each page you can change the page layout style, header skin, footer skin and much more! Check the screenshot and read the documentation to see how it works

c. Set a page as Home Page
Step 1 - Go to Settings > Reading in your WordPress Dashboard panel.
Step 2 - Set "Front page displays" to a "Static Page".
Step 3 - In the drop down menu for "Front Page" choose a page which will be your home page.
Step 4 - Leave the drop down menu for "Posts page" empty, as this is not used by the theme.
Step 5 - Save changes.

Step 1 - Log in to your WordPress Administration Panel (Dashboard)
Step 2 - Click the 'Posts' tab.
Step 3 - Click the 'Add New' sub-tab.
Step 4 - Start filling in the blanks: enter your post title in the upper field, and enter your post body content in the main post editing box below it.
Step 5 - As needed, select a category, add tags, post format, fill in the meta setings below the editor.
Step 6 - Upload a featured image for your Post.
Step 7 - Select Post Format. You can create blog post with a lot of Formats like link, gallery, image ..... Select format on Format box from in right sidebar
Step 8 - Scroll down until you see the Post Configuration box, there you will be able to customize the post.

Step 9 - When your post is ready, click Publish.
Navigate to Posts → All Posts
You can see all informations of you blog post, add new, edit or delete them.

Option 1. Create Blog Page with Visual Element
Step 1 - Log in to your WordPress Administration Panel (Dashboard)..
Step 2 - Click on Pages > Add New.
Step 3 - Give your page a name then Change the Editor to Backend Editor ( you need to have the Visual Composer plugin activated ).
Step 4 - Click on the Add Element button
Step 5 - Select the Tbay New Elements.


Front end look like :

Option 2. Create Blog page with Blog template
Step 1 - Log in to your WordPress Administration Panel (Dashboard)..
Step 2 - Click on Pages > Add New.
Step 3 - From Page Attribubtes -> Select Template : Blog.

Step 4 - Set up Page configuration

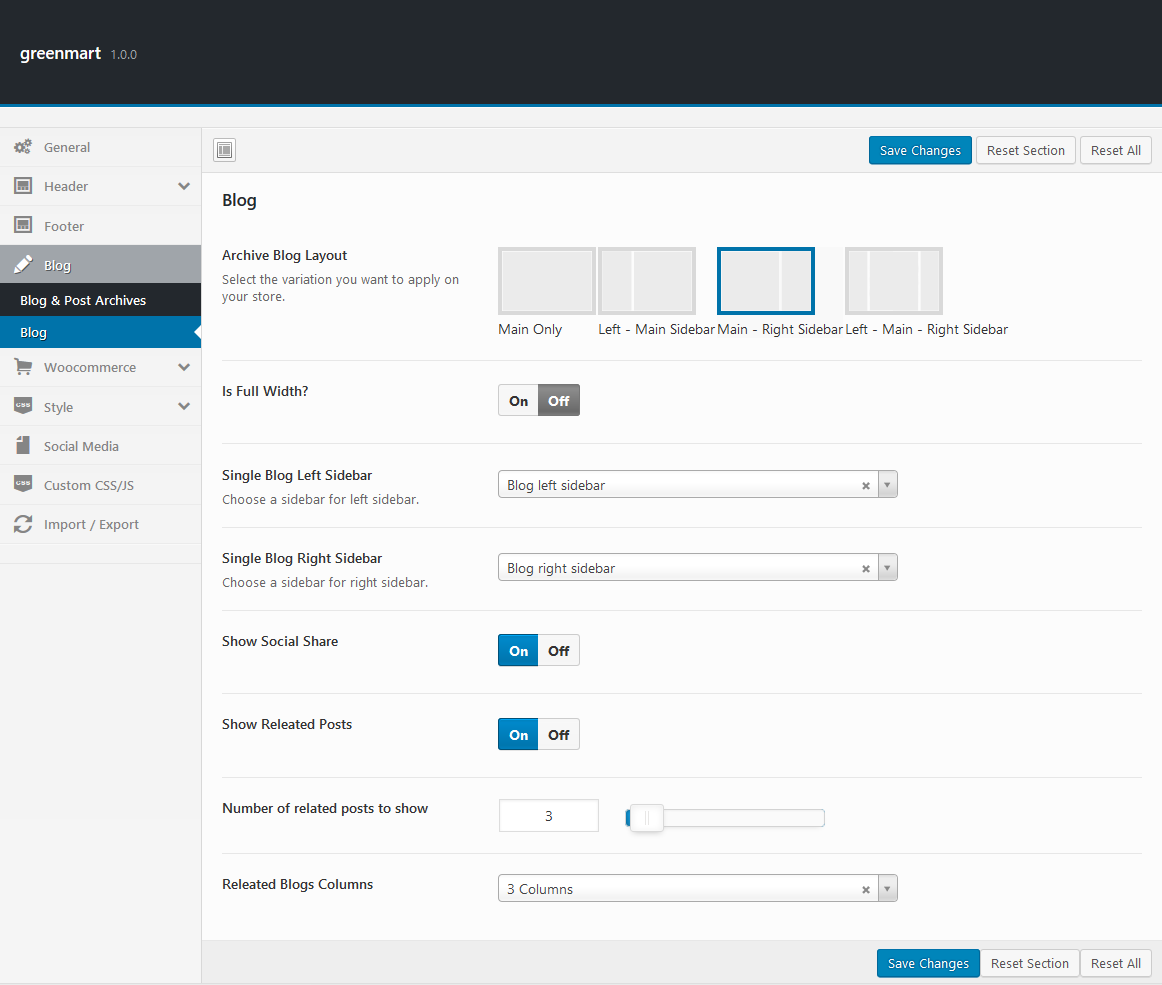
Step 1 - From your admin Dashboard navigate to : Apperance > Customize > Blog

Step 2 - Set up Archive & Category Setting.
You can set Global (default) layout for archive blog page and category blog post then select content sidebar to display

Step 3 - Set up Single Post Setting
Step 1 - From admin Dashboard, navigate to Tbay Footer > Add Profile Footer
Step 2 - Using Visual Composer backend editor mode then add element to your Footer

Step 3 - Build your footer style with unlimited layout
Footer layouts for you.
Footer 1.
Front end look like :

Visual Element Layout setting

Step 4 - After create your footer profile. Navigate to : Apperance > Customize > Theme And Layout Setting.
Choose your footer for page.

*********** If you want specific Footer for one of your pages. Please go to your page configuration. Select Footer version you want to display only on that page.
Step 1: Go to Tbay Testimonial from Dashboard then create content of Testimonials

Step 2: Drag Tbay Testimonial elements by using Visual Composer on page you want to display testimonials.
You can choose some setting like title, skin ....

Step 1: Go to Tbay Brands from Dashboard then create Brands

Step 2: Drag Tbay Brands elements by using Visual Composer on page you want to display brands.
You can choose some setting like title, number of brands ....
Make sure you install and active Contact Form 7 plugin to continue reading.
Step 1 - Log in to your WordPress Dashboard, go to Contact > Add New

Step 2 - Give a Name to your form and change Mail Info


Step 3 - Edit the Form field to change the Form Layout

Step 1 - Log in to your WordPress Administration Panel (Dasrdoard)..
Step 2 - Click on Pages > Add New.
Step 3 - Give your page a name then Change the Editor to Backend Editor ( you need to have the Visual Composer plugin activated ).
Step 4 - Click on the Add Element button

Step 5 - Select the Contact Form 7 element.

Step 6 - The Contact Form 7 Settings should appear. Select the Form you want to use you can also customize the Color and change the fields layout and button design
Step 7 - Update / Publish your page
Vrysa Theme use Customizer provides an ultra effective and intuitive way to customize theme layout & setting with real-time preview. Bring all of settings to customizer, you do not need to using another theme option anymore
To access Customizer go to your admin Dashboard Navigate to Appearance >> Customize
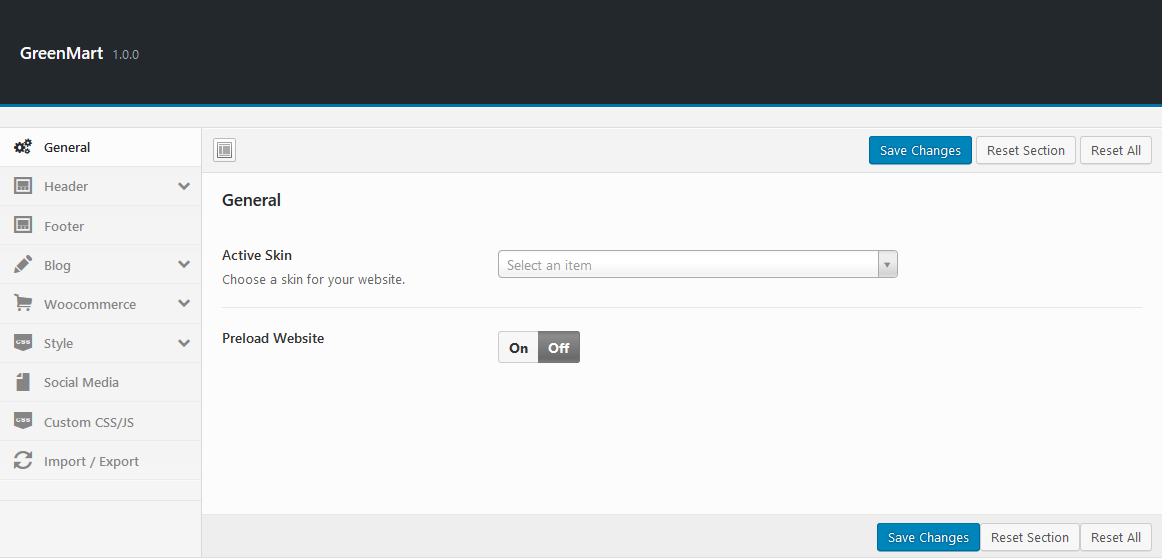
1. General Setting : Manage general setting like your logo,favicon, copyright, ....
2. Header Setting: select your header style
3. Footer Setting : footer style for global
4. Blog Setting : manage global setting for Blogs
5. WooCommerce Setting: manage global setting for Woocommerce
6. Style : custom style
7. Socials Media : select social channel apperance to sharing
8. Custom CSS/JS : Custom CSS/JS
The easiest way to translate theme to the language of your choice is to use "WPML" plugin.
- To begin, be sure you have the WPML Plugin installed and activated, along with the WPML String Translation plugin.
- To set up WPML the first time, follow their Getting Started Guide.To begin translating, select WPML (in the Dashboard menu) -> String Translation. You should see a list of the strings in the theme (there should be only four), with blue translation links to the right. Click these links to reveal the list of languages you use on your blog and the associated translations.
- How to set and translate main features of the theme
- How to scan strings coming from the theme
- How to translate strings using String Translation
- If adjustment is needed for WPML language switcher please also add this
- If you need more help with WPML plugin. Please go WPML Forum
Loco Translate provides in-browser editing of WordPress translation files.
It also provides localization tools for developers, such as extracting strings and generating templates.


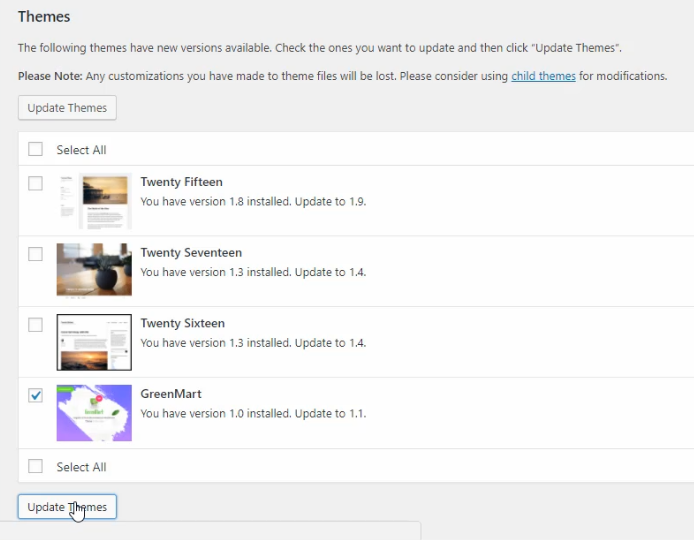
This method requires more steps and manual work. First, you need to manually download the new theme package from your ThemeForest account. Once you have the new theme package, you can choose to upload the theme via WordPress or via FTP. Please see the information below for how to download new files, and install it via WordPress or via FTP.
IMPORTANT NOTE
If you upgrade through FTP, please visit your WP-admin so any new theme options can be registered. If you do not do this and also have wp-debug turned on, you may see php notices on the front end. They will disappear once you visit the WP admin.
If "Download Demos" don't work, you should upload the sample data manually:
- Upload Data to the directory "ROOT/wp-content/uploads/{theme_name}_import/".
- Eg "ROOT/wp-content/uploads/cena_import/"
- Can use the "WP File Manager" plugin and import as like this video's tutorial or upload files via FTP.
There are 3 ways to do this:


- Active child theme Vrysa
- Add the following code to the file functions.php
- Active child theme Vrysa
remove_action( 'after_setup_theme', 'Vrysa_woo_setup' );
- Create regenerate thumbnails http://awesomescreenshot.com/01d6e8u8ad
- Open the file ROOT/wp-content/themes/Vrysa/inc/vendors/woocommerce/functions.php
- Edit the CODE
$catalog = array(
'width'     => '427',   // px
'height'    => '548',   // px
'crop'      => 1        // true
);

$single = array(
'width'     => '570',   // px
'height'    => '734',   // px
'crop'      => 1        // true
);

$thumbnail = array(
'width'     => '100',    // px
'height'    => '129',   // px
'crop'      => 1        // true
);
If "Select Category" drop down list don't show, please follow the following video tutorial
You can override css by 3 ways below :
See my video
Use Child Themes to Modify Theme
A child theme is a theme that inherits the functionality and styling of another theme, called the parent theme. Child themes are the recommended way of modifying an existing theme.
There are a few reasons why you would want to use a child theme:
In this theme, we offer you a sample Child Theme (Vrysa-child.zip). You install it like normal theme.
But you can create your own Child Theme form by following the instructions below
Link instructions How to Create a Child Theme
You can follow this video:
To Speed Up Your WordPress Theme , you must perform the following steps ( and configure as my video ):
(Reduce image file sizes, improve performance and boost your SEO using the free WPMU DEV WordPress Smush API.)
(Simple but effective plugin allows you to extensively clean up your WordPress database and optimize it without doing manual queries.)
(Easy Web Performance Optimization (WPO) using caching: browser, page, object, database, minify and content delivery network support.)
Link file Import configuration : http://wordpress.vinagecko.net/l/speed-w3total-cache.zip
If after config, your website fails , please configure as image : http://nimb.ws/7pMQgd
In addition to the above, you can speed up by the following ways :
This is similar to the section above on using CDN’s, but I’ve become so fond of CloudFlare since I discussed it in my best web analytics post that I’ve decided to include it separately here.
To put it bluntly, CloudFlare, along with the W3 Total Cache plugin discussed above, are a really potent combination (they integrate with each other) that will greatly improve not only the speed, but the security of your site.
When starting out, a shared host might seem like a bargain (“Unlimited page views!”). It comes at another cost: incredibly slow site speed and frequent down time during high traffic periods.
If you plan on publishing popular stuff, you’re killing yourself by running your WordPress site on shared hosting.
The stress of your site going down after getting a big feature is enough to create a few early gray hairs: don’t be a victim, invest in proper hosting.
The only WordPress host I continually recommend is…
✓ WP Engine managed WordPress hosting
My sites are always blazingly fast, never have downtime when I get huge features (like when I was featured on the Discovery Channel blog!), and the back-end is very easy to use.
Last but not least, support is top notch, which is a must when it comes to hosting. Take it from someone who’s learned that the hard way.
Head on over to the WP Engine homepage and check out their offerings, you’ll be happy you did.
All of your favorite big blogs are making use of this, and if you are into online marketing using WordPress (as I’m sure many of my readers are) you won’t be surprised to here that some of your favorite blogs like Copyblogger are making use of CDN’s.
Essentially, a CDN, or content delivery network, takes all your static files you’ve got on your site (CSS, Javascript and images etc) and lets visitors download them as fast as possible by serving the files on servers as close to them as possible.
I pernewyorklly use the Max CDN Content Delivery Network on my WordPress sites, as I’ve found that they have the most reanewyorkble prices and their dashboard is very simple to use (and comes with video tutorials for setting it up, takes only a few minutes).
There is a plugin called Free-CDN that promises to do the same, although I haven’t tested it.
In case you cannot see the Registration Form on the My Account page or checkout page, it means you need to enable it.
You can find this setting by navigating to WooCommerce >> Settings.
Open Account Tab In the Registration section, make sure the" Enable registration on the "Checkout" page" and “Enable registration on the “My Account” page” options is checked.
This is what you should be seeing on your screen:

Version 1.2.1 (December 08, 2017)
- Add new feature Catalog mode (Woocommerce)
- Fix bug in Addon "Products Categories Tabs"
Version 1.2 (December 08, 2017)
- Add Option Hide the footer in mobile
- Fix Search button don't work on mobile
- Fix Customize Style
- Fix bug Logo home 6
Version 1.1 (December 05, 2017)
- Add product Navigator Image
- Add Video for Product Detail
- Add Preloader styles
- Add new style for Compare Popup
- Fix bug style of RTL
Version 1.0 (December 04, 2017)
- First Release!